|
|
|
 |
 |
 |
 |
 |
 |
 |
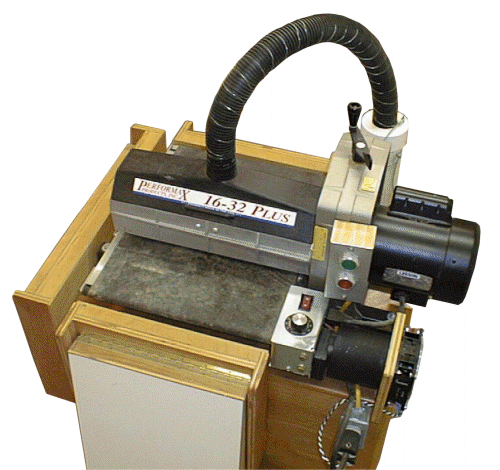
This page shows the Performax 16/32+ drum sander with some of the modifications I have made to it. Note that the model of machine shown here is not the current production model. If not for the fact that my model is somewhat out of date I would draw comparisons between it and other models on the market. In lieu of that, I'll try and describe how these types of machines work in general and some of the modifications I've made to mine. I originally bought my sander to thickness resawn veneer, veneer glue-ups, and general purpose sanding. I still use it for this function but less so for general purpose sanding unless I have a batch job to run through it.Delivery The machine I bought was delivered by UPS in two or three boxes. Even though it can be shipped via UPS the separate boxes are quite heavy; the assembled machine is heavier than it looks as well. Aside from the trouble getting the components out their boxes by myself, I had no other problems, there were no damaged or missing parts. At the time the belt clip holder tool was not included with the machine. The tool was sent to me for free after I had filled out the warranty card. I bought my machine from Klingspor which at the time included the stand and some additional paper; this made it a slightly better deal than others were offering at that time. Customer Service When I was researching this machine there was very little user information available about it. I posted questions on wood forums and received some useful feedback but I also contacted Performax directly and talked to a factory rep as well. Although the factory rep was obviously biased he was able to provide me with meaningful information on his product as well as the differences between it and the competitors machine as well as useful information regarding the proper operation of a drum sander. Based upon this information I decided to buy the Performax over the Ryobi which at that time was the only competitive machine available. To this date I have had no reason to contact Performax regarding my machine. Documentation The owners’ manual described how to assemble the basic machine as well as how to adjust and operate it. The manual is very similar in quality to any Delta or Jet manuals I have. Assembly There isn’t all that much to assemble on the machine and it goes fairly quickly. This model of the sander is in its fourth generation, my machine is a second generation. This relates to assembly in that my machine has a different roller bed and lacks a true method for alignment. For a machine to qualify as having a feature that can be "aligned" I submit that it must have some component that when adjusted in small increments will move parts of the machine relative to others to achieve proper alignment. Third generation machines come with some sort of aid that allows the drum to be positioned relative to the bed, mine did not. Even though my machine in effect isn’t aligned (it’s "assembled") I was able to get it very close to perfectly aligned by following the manual and I have not had to adjust it since (which surprises me some). The only problem I have ever had with the machine is belt tracking. When new it seemed to require constant fiddling. It doesn’t require this attention any longer, I’ve either got it set correctly or it is broken in now. Operation Any drum sanding machine similar to the Performax is unlike most any other woodworking machine typically found in the shop and takes a fair amount of experience to operate well. First, the machine isn’t really a thicknesser in the same sense of a thickness planer that uses steel knives to cut wood. Although the machine does in fact thickness stock, to use one of these machines in place of a planer would be a mistake. Since very little stock can be removed in a single pass and the feed rate is so slow, it would take a great deal longer to plane boards using one of these machines as compared to a true planer. However, on some highly figured woods, a drum sander may be the best option. When running narrow stock the machine would be hard pressed to take off 1/32" in a single pass without bogging the motor down when using medium grit paper. When doing wide panels, 1/64" is a pretty big cut and even then the open end side is likely to be a few thousandths thicker due to deflection on the assembly. To surface wide panels, I typically take off 1/128" or 1/64" at a time and on the final passes I’ll run them through at least twice to get a consistent thickness across the entire panel. If too big of a bite is taken during a run or if there is some feed problem, the result is most likely a burn strip in the paper and the stock as well. This is easier to encounter in stock like hard maple and less likely in open pored stock like red oak. Burn marks can be taken out on subsequent passes but they aren’t fun to deal with especially if they are induced on a final pass. Compared to a thickness planer, the surface quality this machine will produce is excellent. The surface is quite flat and uniform. The only down-side is that the surface is streaky when compared to other sanding methods. With 120g paper in the drum sander will produce very visible lines in the stock as compared to a 120g belt on a hand belt sander. The streaks can be removed with subsequent sanding operations and are more difficult to remove on cross-grain. The initial depth of the cut should be set as follows:
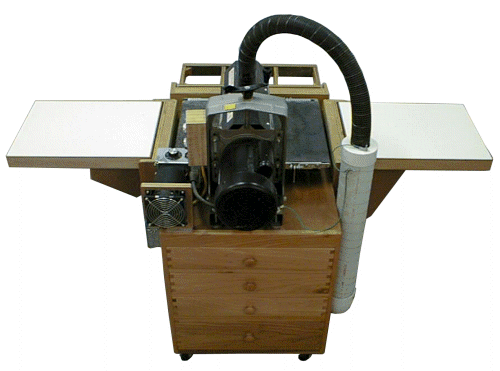
Summary This type of machine is not for everyone, they are a little finicky to operate well, are slow, costly, and the paper is expensive. The benefits are they can sand stock exceptionally flat, thickness figured stock without tear-out, as well as very small items that would be difficult to process otherwise. If I were to be in the market now for a similar machine I would still prefer the Performax over the Ryobi due to quality and the motor duty cycle. I would prefer it over the Delta due to some small features and at this writing the Delta still has some bugs to work out of it’s system. I would however also consider other machines like the Woodmaster or the imported open ended belt sanders. Below is a picture of the sander; as with many tools the stand that came with the machine served no purpose except to lift the machine up off of the floor. In order to create more storage space I built a rolling cabinet to mount the machine on. To make it easier to hook up to my dust collector, I plumbed a 4" PVC line onto the cart which reduces to a 2.5" line to attach to the drum hood. The dust collection is very good attached to a 650cfm collector.
|
 |
The view below shows the cabinet from the front and the extension wings extended. Although the machine can be used without infeed / outfeed support, stock of any significant length is likely to have snipe if they are not used. All the supports fold down out of the way when not in use, the side support is just a frame and the in / out supports are hollow core torsion boxes; piano hinges are used for strength and accuracy. The cart sits on 3" wheels and has 4 drawers for storing sandpaper of all kinds. In this view more of the PVC ductwork can be seen. A 22ga bare wire is wrapped around the PVC and shop-vac hose which is then attached to the motor frame ground, this eliminates any static shock hazard. |
 |
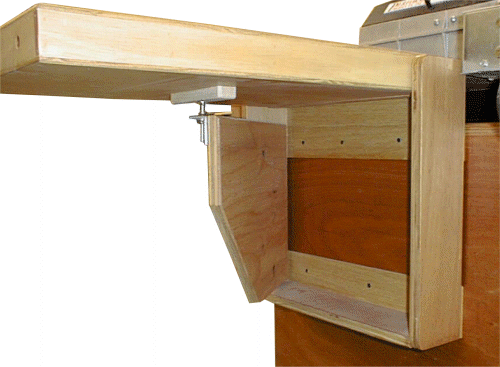
This is a close up from under the infeed support. A simple arm is all that supports the table, at the end of the arm is a carriage bolt the head of which sits inside a socket made from wood attached to the bottom of the table. The support table is set so that the edge closest to the sander is even with the feed belt. By using the bolt, the far side of the table can be adjusted for a slight upward bias; the outfeed is adjusted in the same manner. By biasing the tables this way the path past the drum is actually in the form of an upward bow. This seems to be helpful in maintaining downward pressure on the stock under the drum and reducing snipe. |
 |
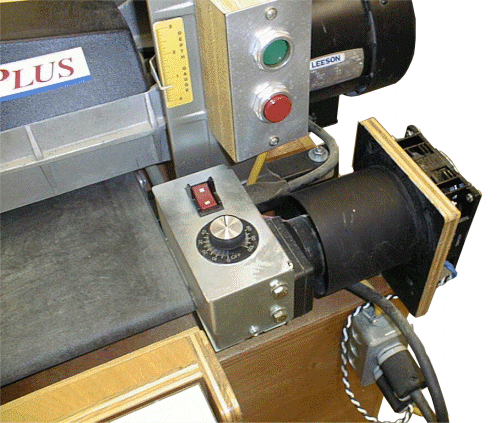
I modified the electrics on the machine a little as well. The machine has two separate on / off controls, one for the drum and one for the belt which is incorporated in the speed dial. I maintain these switches but have added a master on / off switch seen here mounted to the motor / drum frame. When I first started using the machine it seemed like the belt drive motor was getting too hot after extended runs. Since excessive heat can shorten the life of any motor, I installed a 4" muffin fan to cool this motor. The fan works quite well and the motor runs significantly cooler than before; the fan is automatically switched on with the master switch. |
 |
 |
 |
 |
 |
 |
 |
 |