|
|
|
Calibrating the Festool Hole Guide
 |
 |
 |
 |
 |
 |
 |
| In order to work properly, the
Festool Hole Guide must be calibrated. This is a fairly simple process that only
needs to be done one time. The owners manual covers the basics of the process, this
is a more visual real world explanation. The calibration is basically to get the
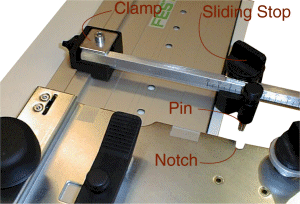
indicators on both positioning arms to read correctly. There is a notch in the Hole Guide baseplate that fits the pin of the sliding stop. For the initial calibration, one sets the sliding stop to the zero mark and locks it in place. In order to get the pin into the notch, the bolt holding the clamp on the positioning arm assembly must be loosened. |
|
| Once the whole assembly is positioned so the pin can go into the notch, the bolt is tightened down and the process is repeated for the other positioning arm assembly. | |
 |
The preceding steps would get one
close or perhaps even right on. There is just a little play between the notch and
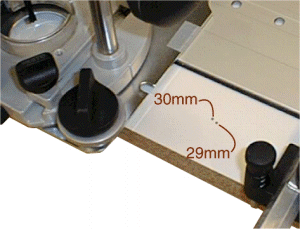
the pin so it is possible to still be off a little. To check the calibration, the router should be installed in the baseplate as per instructions preferably with one of the drill bits installed, a sample piece of stock will also be needed. This entire operation can be performed with the power off. The Guide system is set up as if to drill a hole, set the sliding stops to some convenient mark and make a center point mark on the stock with the router. |
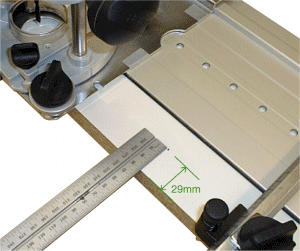
| Using a good scale now
measure the position of the center point relative to the stock edge. In the example
shown above, I'm reading 29mm, the sliding stop was set to 30mm so I have an error of
1mm. This enough of an error that I would like to fine tune the calibration. Note that the centering device used to set the router correctly on the baseplate doesn't have any play so it doesn't figure into the calibration process. This is assuming of course it has been installed correctly and that the play between the baseplate and the guide itself has been taken out as per the instructions. |
|
In this example, I need to bias my
sliding stop by 1mm and recalibrate. What I would do in this case would be to:
Note that the sliding stops now read what I actually get for a true position. To test, I could reset the system for the original 30mm offset and make another center point mark. In this view you can see both calibration markings. |
|
 |
 |
 |
 |
 |
 |
 |