|
|
|
 |
 |
 |
 |
 |
 |
 |
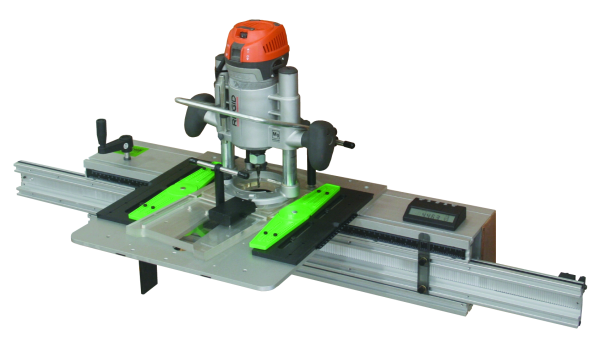 |
| Description The Router Boss is a 3-axis router station that will allow the craftsman to create a multitude of woodworking joints. The Router Boss is unconventional because it's part machine, part jig - and that is what imparts it with such a high degree of versatility. The tool is offered in three
sizes, the X-axis (left to right) motion capacity being the major differences between the
models. The 360 model has 28" of travel, the 420 model has 34" of travel, and
the 470 model has 39" of travel. The X clamping range is always a little less than
the travel. |
| Capacity On the 470 model reviewed here, the standard clamping capacity on the sliding bar is 36" while the travel range is 39". That enough range for nearly any cabinet door or table leg. The two included X axis cursors can be placed just about anywhere so they are fully useable across the stroke range. The same is true of the X axis DRO. The maximum joint making capacity in the Y axis is over 10 inches. This means that a groove or similar joint can be madeacross the face of stock up to ~10 inches wide. For typical joint this capacity is fine, for a bookcase or similar project, it could be a bit small. The opening in the base plate varies from 3 inches to 1.5 inches wide. This is adequate for any operation I'd care to attempt with the jig. |
Assembly The other major assembly aspect is related to mounting a baseplate to the main beam and then the router to a moveable baseplate. It's absolutely critical that the router be mounted accurately to it's baseplate and that the guides be mounted precisely as well. These two determine quite a bit of the accuracy of the machine. |
 |
 |
The manual describes how to mount all these parts together and
the criticality thereof. The jig ships with an Allen key set for assembly, you're going to
need that tool later too for all the adjustments and jigs that can attach to the tool.
There are a few critical aspects but assembly is not particularly hard but may take as
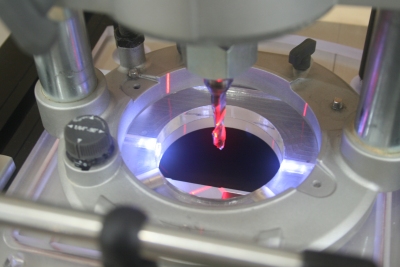
long as any other large woodworking tool to complete. The laser lines are handy when installing the router to it's baseplate. The projected lines are a little fat but for this it's fine. In cutting operations I find them too wide to use most often. |
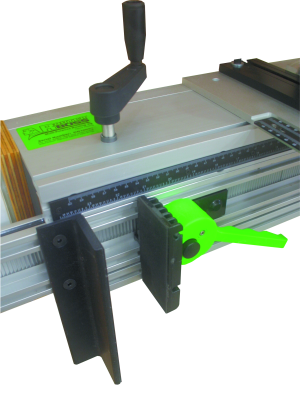
| A note on the dovetail guide rails, a little slop in the pivot point on the green wings is intentional, they must be able to move along the x-axis in order to adjust to the proper angle. |
| Operation A thick spiral bound, shop-worthy manual is supplied with the jig. Overall the manual is good and describes how to make all the common joints with the tool as well as a couple of jigs. The Craftsman Gallery web site supplants the manual with several good video tutorials and additional instructions. I highly recommend watching all the video's prior to the purchase of this tool. The heart of the tool is the X axis sliding carriage. With it you can make very controlled cuts. It allows them to be made in either climb or conventional directions and moves in a very smooth and controlled manner. |
| Operation of the tool itself is fairly straightforward. To make a tenon for example, one simply clamps the stock to the sliding carriage and the cut is made on the layout lines cut using XYZ motions. Now if you want to do all this with more accuracy than "by-eye", stops can be setup to guarantee the router and stock cannot move outside precise dimensional limits. |
 |
Further, if you happen to have any of the optional digital
readouts (DRO) installed the cut can be made or setup using the numerical readouts. That
in a nutshell is what this tool allows you to do, move the stock or cutter to create the
desired joint. There will always be more than one way to cut any joint on the tool as well
- as there is no guide bushing to inhibit this. There are accessories that can be bought or built and attached to the sliding carriage that will allow the user to clamp stock under the cutter in a variety of ways. Basically, if the cut is within the stroke limits of the tool, there is a way to clamp it up to be made. |
| Joints The Router Boss is capable of cutting just about any joint, here is a brief description of several of the most common joints and how they apply to the tool: |
| Dovetails The Router Boss cuts dovetails in just about any degree you would ever care to, either the through or half-blind type. The setup for cutting these joints is more involved than typical. This issue is directly proportional to the versatility of the tool. If you make something that does nearly everything, it's going to be more involved than a single purpose jig or tool. A direct byproduct of the aforementioned versatility is that the tool has the ability to use very slender HSS dovetail cutters. These provide for true "hand cut" proportional joints. Again, I'll recommend looking at the videos available on the Craftsman Gallery web site for more info on this. |
 |
| The fit of the joint can be adjusted via the position of the
guide rails. A very accurate scale is used to effectively change the width of the
"vee" (called the Tail). Unlike most dovetail jigs, the work piece moves to each
new cutting position instead of the router. When cutting
dovetail "tails", the adjustable angle guide rails are used. There are four
little pins that are inserted into holes to fix the desired angle, the only adjustment is
for fit done in the y-axis. Box Joint |
| Mortise & Tenon When cutting anything besides dovetails, the fixed guide rails are probably what will be employed as they have the added benefit of accepting the precision stop blocks. Here you can see the optional M&T table attached. This same item
can be attached verticaly if disassembled. |
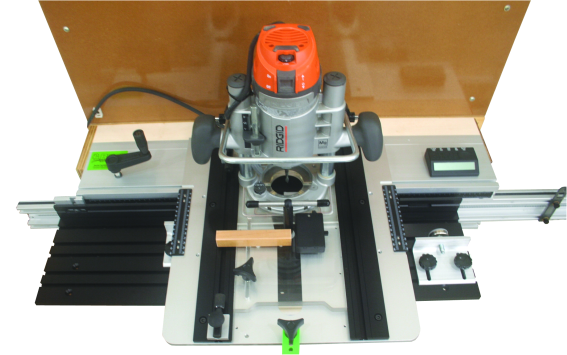 |
| This type of joint requires fairly accurate positioning and an even more accurate size match between the mortise hole and the tenon that goes into it. Because it uses a router, the Router Boss only cuts rounded mortises, that usually isn't a problem, a little hand chisel work can turn a round mortise into a square one easily. I prefer instead to round off the tenons myself with a file. | |
 |
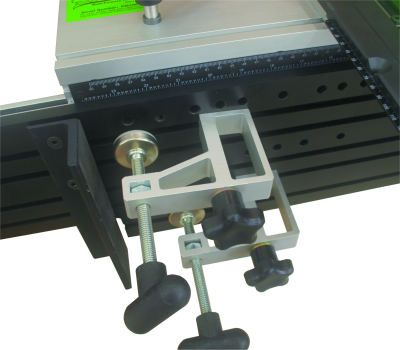
When it comes to cutting mortises in the sides of long stock
you'll run into a clamping challenge, the standard clamp is intended to hold stock
vertically, not horizontally. You can make a jig yourself to attach to the sliding bar
called a mortise table, plans for a simple one are in the manual. You can also buy the one
offered by The Craftsman Gallery. It's a large and very heavy duty aluminum assembly that
provides an adjustable height horizontal surface for occasions just like this. It includes
a couple of simple but clever L clamps as well. This mortise table will still allow
vertical work to be clamped up to 1.25" x 3.5" wide via a hole in the table. It's when cutting M&T that the climb cut aspect comes more into effect. Climb cutting is essentially traversing the tool in the same direction as the cutter rotation. In most cases, this is a no-no. Because you are not really feeding the stock by hand, this is an entirely doable and safe operating mode with the Router Boss, it is essentially a power feed. Climb cutting will often result in a smoother and more consistent cut with less tear out thus it is preferred. |
| Doweling / Drilling Doweling is fairly intolerant of error; you nearly always need two or more and they have to be cut very true in the XYZ axis and spaced very accurately with respect to each other to be any good at all. I don't use dowels much for these reasons but there are times where a dowel is the best joint for the situation. The DRO is what really turns this into a high precision task. The dowel or drill holes will be very clean due to the router - you will want to use a spiral upcut bit of the extra-long variety. This is a time when you might need that riser kit mentioned later. Edge Profiles / Grooves Slot, groove, rabbet, and even sliding dovetails are all in the same family of joinery. If these joints are within the travel stroke of the Router Boss, they would be cut using the standard clamp or the mortise table attachment. If they require longer cuts than can be achieved this way, the Router Boss needs to be effectively turned into an upside down router table. There is an optional kit for this which includes a base riser as well as some feather boards and a bristle brush; basically things to help you defy gravity while performing this operation. I personally prefer not to pick a fight with gravity, especially when these operations can be easily performed on a standard router table or with an edge guide. Dust Collection |
| Accessories My unit was supplied with the optional DRO, the Mortise table, the riser kit (aka router table) and the plunge assist kit. There are actually several more accessories that allow DRO's to be installed on all three axis as well as a couple other work holding jigs. The Craftsman Gallery also sells other more common tools generally useful for any operation including the use of the Router Boss. Of the four major accessories I tested, the DRO and plunge assist really stand out for usefulness. Using a DRO allows you to operate any tool in a more precise and repeatable manner. The plunge assist allows you to operate the Z axis with one hand leaving the other to operate the other axis, very handy on this particular tool. The mortise table kit is a very heavy duty jig and although a little costly, I don't think you could make anything this versatile or strong as easily yourself - there's a lot of value in it. |
 |
| Summary Woodworking is about making proper joints that fit, and if exposed, look nice. The router is one of the most versatile shop tools and excels at making these joints, the problem is that it takes a lot of jigs to get it to do it. It doesn't take much observation to determine that a 3-axis milling machine would solve this issue - and that's exactly what the Router Boss is. It can cut a wide array of joints from simple lap joints, box joints, mortise & tenon, dovetails, dado, sliding dovetail, and just about any other joint you can imagine. If you can clamp it, odds are you can cut it. There is no "one size fits all" solution when it comes to making woodworking joints. There are a lot of single purpose solutions, which work to varying degrees of success. There are few tools that attempt to cover such as broad spectrum of joints such as the Router Boss, it's one of the most effective joint making solutions on the market. |
In the interest of full disclosure The Craftsman Gallery provided this product to facilitate this review. Another article that may be of interest is a Joint Comparison chart listing the capabilities of several jigs and machines.
|
 |
 |
 |
 |
 |
 |
 |