|
|
|
 |
 |
 |
 |
 |
 |
 |
| Description The JessEm Mast-R-Slide is a small sliding table that is designed to replace the left wing on (typically) a table saw. In general form and construction, the JessEm unit greatly resembles a Format type sliding table. It uses some fairly large and robust aluminum extrusions for the sliding table itself as well as the supporting undercarriage. The unit includes a small support table used to increase the sliding table size somewhat as well as a crosscut fence with flip stop and extension section. The sliding table is supported by 30 roller bearings which let the unit operate like some other telescopic models. The means that the static footprint of the device is no bigger than the unit itself since it does not require a guide bar or other components to support it. For small sliders especially, I prefer this telescopic type due to this lower space requirement. |
 |
|
Assembly
There isn't much assembly required, most of the setup will be in alignment of the unit. In order to install the sliding table, the left extension wing should be removed. Technically speaking, this is not absolutely required but it is highly recommended. The reason being is that the closer the sliding table is to the cutter, the better it will work. In addition, the rip fence rail(s) must be moved to the right or cut. Most often, the rails can be moved. How much work is required to do this depends upon the specific machine and the design of it's rip fence system. |
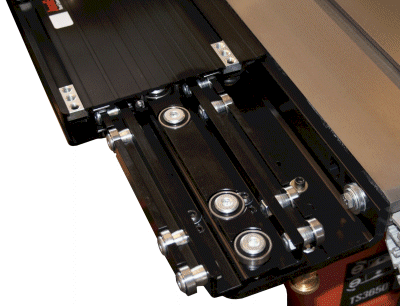
| Once this is done, the JessEm can be installed. The main table and Under Carriage Assembly is already assembled together; these must be separated in order to attach the device to the saw. The Under Carriage Assembly is bolted to the main saw table. The manual says it should be 3/16" below the main table as an initial alignment. I recommend dropping it a bit more to 7/32" or even 1/4", it will give a little more room to adjust and align the unit later. The Under Carriage Assembly is fairly sturdy and it needs to be because it cantilevers off of the main table, there is no other additional support from the saw rails or anything else. | |
| Alignment All sliding tables require alignment when installed. In theory, this alignment is about the same as it is for a standard miter gauge. In practice, sliders are quite a bit more finicky to align simply because there are more parts and align-able features to set. Sliding table makers seldom make this process easy with the best of instructions, design, or hardware. The alignment process for the Mast-R-Slide is beyond the scope of this article but I will say they did a pretty decent job in this regard. Before going further, I will HIGHLY RECOMMEND checking (and correcting if needed) the alignment of the other parts of the saw before installing and aligning this or any other sliding table. This can make this alignment process faster and easier. The Under Carriage Assembly consists of a main angle piece that is rigidly bolted to the saw table and another Guide Assembly that is bolted to this. The exact position of the Guide Assembly determines the alignment of the Mast-R-Slide. The first alignment is for travel parallel to the blade. Basically, one simply adjusts the angle of the Guide Assembly by loosening it's attachment bolts and tapping it into proper alignment. Note that the initial adjustment will be a fairly large movement because the table will need to be moved closer to the blade to allow the sliding table lock to engage properly. This is the crudest alignment process on the unit and will probably take a lot of trail and error to get right. The next alignment is to make the sliding table surface level with the main saw table. The height and "surface angle" (in both X and Y axis) relative to the plane of the main saw table is controlled via 8 pairs of cap and set screws in the Guide Assembly. I found that the table on my unit was a little bowed down on the blade side by about 0.017" and 0.003" to 0.004" in other locations. The goal here is to get the greater area of the sliding table to be co-planar or even with the main table as it travels back and forth. The design presents a decently refined method of aligning this aspect but it will still take a lot of twiddling to get dialed right in. The trick here is to make a coarse alignment using only 3 or 4 pairs of screws (ensuring the table still runs freely) and then to dial it in with very small adjustments of all 8 pairs. One can easily spend a couple of hours aligning a device such as this; the effort spent is well worth it and the alignment should hold for a long time. Sliding table alignment can take a fair amount of time and even be frustrating at times. I plan to publish a more detailed alignment article for the JessEm in the future to illustrate basic principles and some tricks especially for this model. |
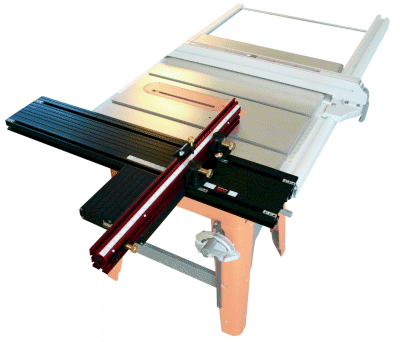
| In Use Once the unit is assembled, aligned, and it's crosscut fence and extension table installed, it is ready for use. At almost 8" the table is not as wide as a typical saw extension wing but at 40" it is significantly deeper. In effect, there really isn't an issue with loss of support. Underneath the table is a lock that will allow the table to be fixed with it's edge even with the infeed edge of the main saw table or three other positions. This will come in handy when loading the unit or when performing rip operations. |
 |
| The sliding action is
quite smooth because the table is always in contact with several large bearings. This is a
small slider not really intended to support heavy objects by itself so some additional
side support will be needed when cross cutting big plywood sections or other heavy
objects. Within the sliding table are stops that prevent the operator from over
traveling the table. JessEm thoughtfully put rubber bumpers on these, many other
units just crash into the stops. On sliding tables such as this, it is very important to be able to remove and replace the crosscut fence quickly. This fence will come off in about 7 seconds and back on in about 10, there are no loose parts to contend with either. Unfortunately, there is no return to a calibrated 90 degrees on the mid-mount position. These times above sound low and they are lower than many other sliders. They could be reduced a bit more, these times translate directly into operator convenience. |
|
 |
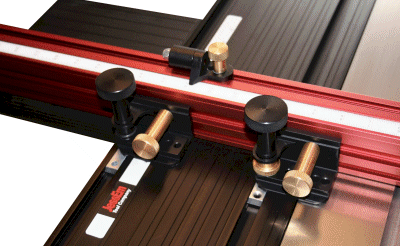
The crosscut fence is installed via two knobs captured by the fence which thread into T-nuts placed in the sliding table. The fence can also be slid left or right as needed to support stock close to the blade. This would most often be used with the fence is angled. Unfortunately, there is no stop to return the fence back to a previously calibrated scale reading. There is a fairly easy shop remedy for this problem however. |
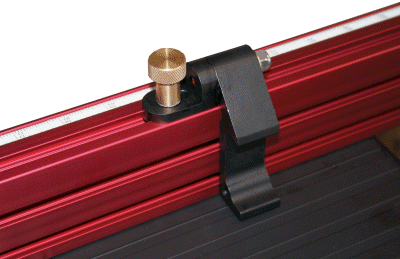
| The crosscut fence is 30" long and has a pull-out extension out to 48"+. This is pretty much the ideal fence length for a small slider such as this. The fence is also equipped with a single flip stop, and an adjustable scale for it. The scale also works with the fence extension. The stop position is easy to read however the device is not balanced and tends to tip when loose so some care must be taken when setting it. The fence can be installed in one of three positions on the sliding table. The mid-mount position allows for the fence to be set at positive or negative angles. The others would be calibrated to 90 degrees only. |  Click for closer view |
 |
The Front or "fore" mounting position allows for about a 37" crosscut capacity. The mid-mount about 28" and Back (or "aft") position allows for about 27" of crosscut capacity. These numbers will vary a little depend on the model of saw the unit is installed on and the height of the blade. For instance, on a cabinet saw the numbers would be more like 34.5 - 24.5 - 36 inches Fore - Mid - Aft. Because the Aft position does not offer any capacity advantage (on my contractor saw) and requires more manipulation for the crosscut fence, I preferred not to use it and took it's T-nuts out also in case I wanted access to the slots in the table for jigs and such. |
| Summary Overall, the JessEm Mast-R-Slide is a joy to use and greatly increases both the safety and usefulness of a tablesaw. I believe the Mast-R-Slide is one of the best designed small sliding tables and although expensive, worth every penny. As with every slider, it will take some time to install and align but the design of the unit avoids many of the pitfalls competing units have not, this will make alignment less painful than several other units.
In the interest of full disclosure JessEm provided this product to facilitate this review.
|
 |
 |
 |
 |
 |
 |
 |