Easy Sliding Dovetail Review

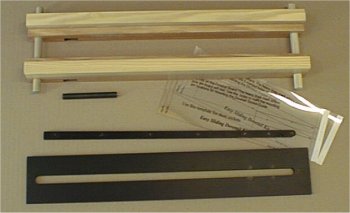
Description
The Easy Sliding Dovetail jig is unique. While there are some jigs that allow one to make sliding dovetails, making a tapered dovetail is a completely different ballgame. The jig consists of three main elements, there is the slot jig, the tail jig, and a router stabilizer used with the tail jig. In addition to the instructions there are also two clear marking guides, a punch and router bit included.
Easy Sliding Dovetail Kit
Tapered Dovetail
Before going much further, a brief explanation of what a tapered sliding dovetail joint is and why you would want to make one is in order. A sliding dovetail is a fairly easy joint to cut; if one is needed for a shelf for example both the mating pieces can be easily milled using a router table setup and any size or angle of dovetail cutter one desires. In the example shelf this type of joint is theoretically superior to a simple dado joint because it not only locates and supports the shelf vertically, it provides a lateral lock as well. In addition to that, it is often considered a more aesthetically pleasing joint if it is exposed.

A tapered sliding dovetail is the same as a non-tapered one except that one end of the joint is a little wider than the other. A typical problem with non-tapered joints is that the longer they are, the greater the likelihood of an interference fit situation developing. The is due to the increasing friction of the joint as it is assembled and other effects as well. A tapered joint gets around this problem by being "loose" until the very last inch or so of the joint where it ALL comes into contact.

While a tapered dovetail has some benefits over many other joints, making a good one can be difficult to say the least. That is because the angles are small and they must be the same on both mating pieces. This is where the Easy Sliding Dovetail jig comes in.

Using The System
Making a joint is basically a two-step process. Cutting the slot is pretty straightforward, you make a line on the stock along the center of the joint, install the jig and cut it with a router. The slot jig is a metal plate with a precisely milled tapered slot in it. On the bottom of the jig are five pins which are used to fasten the jig to the stock. To line up the jig the clear guide is used to layout the positions of these pins and they are pre-punched using the supplied tool. After the pin holes are located, the slot jig is installed by putting it in place and hitting it with a mallet. After it is installed a bearing guided router bit is used to cut the slot. The instructions cover the depth setting for the bit, it is nominally 0.25" deep.

Cutting the tail uses a totally separate jig. The tail jig is basically a small metal plate with a matching taper. The system is designed to form a stopped joint meaning it does not run all the way through (not visible from the "front"). The tail jig also has a series of pins in its bottom side, these are used to affix it to the end of the stock. To install it, the first pin hole must be located 1 ¼" back from the front edge of the stock. Getting the tail jig into proper position is trickier than the slot jig because it is usually installed onto end grain which has a tendency to redirect the punch. Getting the jig into proper position is critical. Once the jig is installed the router stabilizer is clamped to the board. Without this the router would be too unwieldy to cut the joint. The bearing guided cutter is run up against the jig leaving behind the tail joint.

Setting and using the slot jig is probably a little easier than I've made it sound here. The real key to success is the proper use of the tail jig, it can be a bit tricky to setup and execute with the precision required.

Tips:

  1. Both the slot and tail jig must be absolutely flush with the stock, ensure that it is. Otherwise the joint will not mate well.
  2. Run the router at a high speed setting when cutting the joints. Always do a final trim pass to ensure all the required material has been removed.
  3. When cutting the front edge of the tails joint, make a light scoring cut first to prevent any tearout.
  4. The slot jig may tend to pack chips up against its interior side walls. If this happens, clean out the debris and make a second pass with the router to ensure the slot is the proper width at all points.
  5. One must be extra careful that the router is resting on the tails jig when the joint is cut. Otherwise, the joint will not be the same depth as its mating slot.
  6. One must take care that when the tail jig is installed that it is not bent. The end grain can guide the fixing pins off-line to cause this. This condition will cause a very tight fit on the joint and may prevent it from going all the way home.
  7. The system is designed to produce a stopped or half-blind (invisible on the front) joint. If you want a visible joint instead, flip it around to put the stop on the back.

Summary
What this system does is allow you to cut joints that are secure and are even capable of disassembly. It can be used in many traditional joint situations and would be the preferred joint for full blind dovetails.  The Easy Sliding Dovetail jig is the only one of it's kind I know of. To cut this type of joint would otherwise require some type of complicated shop-made jig to use with power tools or some very tedious hand work. The joint itself is probably the ultimate woodworking joint, put one together and you will at once see why this is.

In the interest of full disclosure, Allen Designs LLC  provided this product to facilitate this review.


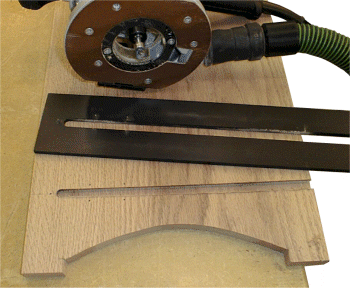
Here is the slot jig after it has been used on a small cabinet side, in this case for a shelf.  In this particular cabinet the jig was used to install one fixed shelf (shown), a drawer divider and the top, all solid wood.

This cabinet is pretty small so I'm using stock that is only about 5/8" thick to try and keep it's appearance more in scale.   Note the five pin holes visible near the front of the joint.  These come from the jig itself and are 0.75" edge to edge.  Because I'm not using 3/4" stock here the ones on the top edge will show when the joint is assembled.  If 3/4" stock were used, they would all disappear.

Slot Jig In Use
Tail Jig In Use 
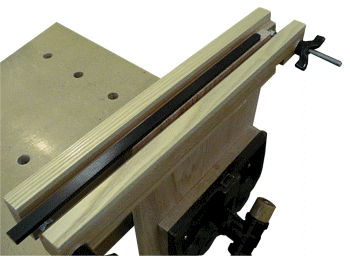
This is a view of the tail jig installed on a board, in this case the shelf that goes into the joint pictured above.

The board is clamped in a vise and the jig is installed.  Getting the jig in the exact middle and the proper distance from the edge is a little tricky, mainly due to the influence the end grain has on the pins.  It is possible the jig can be installed with a small curve because of this too.  The wooden parts on the outside of the stock are included and support the router when the cut is made.  I've replaced the wooden dowels with 3/8-16 carriage bolts and plastic knobs to make clamping this jig to the stock a little easier.

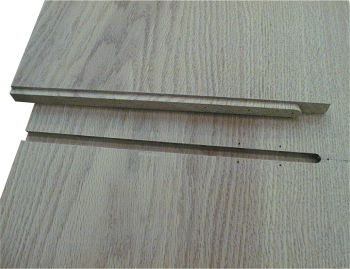
This is a view of the completed joint.  If all has gone well the joint will go together pretty easily until the last inch or so where it may (and should) require a little persuasion.

Just as in all dovetail joinery, straight and square stock is very important in order to achieve success.

Completed Joint